PAS Outpatients - Booking a New Appointment
Estimated Reading Time: 5 MinutesBooking a New Appointment
From your main menu select PAS OP BASIC MENU (M P O B) then select BOOK APPOINTMENT FROM RI (H R I P S). Search for and select the patient.
If you have completed a thorough search and cannot find the patient follow the procedure to register the patient, open the Register the patient page for more information.
If the patient is on PAS ensure the details are correct and update if required.
It is vital that the correct address and GP details are entered on PAS to ensure the patient receives the appointment details and the GP receives all correspondence regarding their patient.
From the Patient Main Details screen type B N for Book New Appointment and press the return key.
Diary Code, - Type the Diary Code (Clinic Code) for the required clinic, for example W I L N J / 1 C or P A R S W / 4 C F, then press the return key.
If you are unsure of a Diary Code type the first three letters of the Consultants surname, press the F1 key and select the appropriate Diary Code.
Extended Help – Will default to N – press the return key.
If the patient has any other appointments, (past or outstanding), you will be taken to the Appointments screen to view.
Type X and press the return key to exit and return to booking the appointments. If the patient has no other appointments the system will automatically take you to the next screen
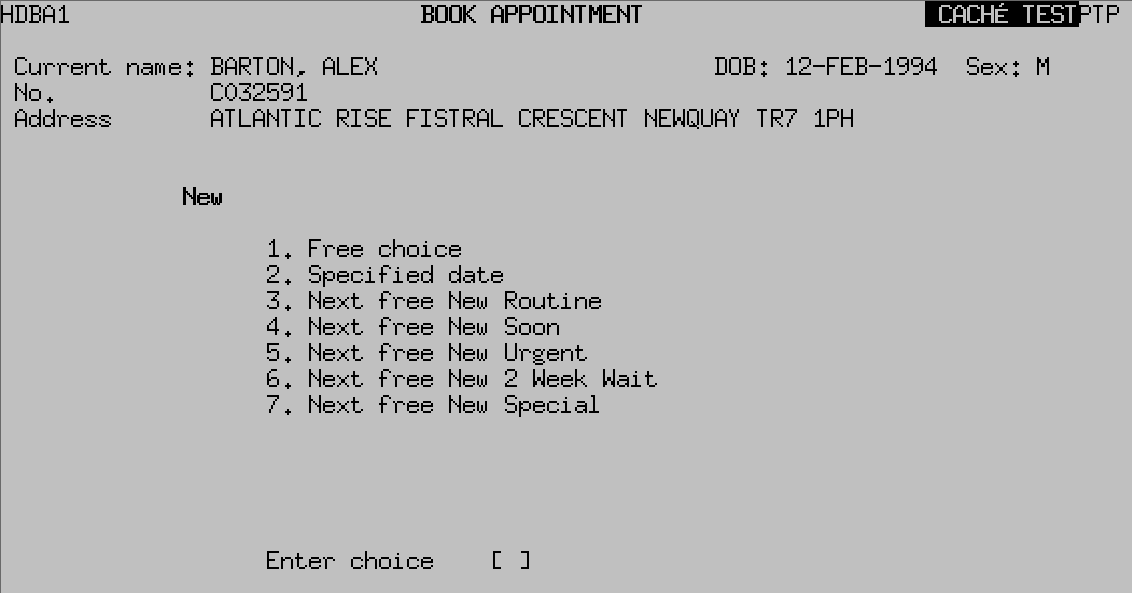
Free Choice, - Will offer you the next clinic.
Specified Date, - This allows you to enter a specific date or Time Period such as T+1M (Today plus 1 month).
Next Free..., - Searches for the next available slot from the date entered in the "Search from ?".
- If Free Choice or Next free... options were used select the time/date slot required.
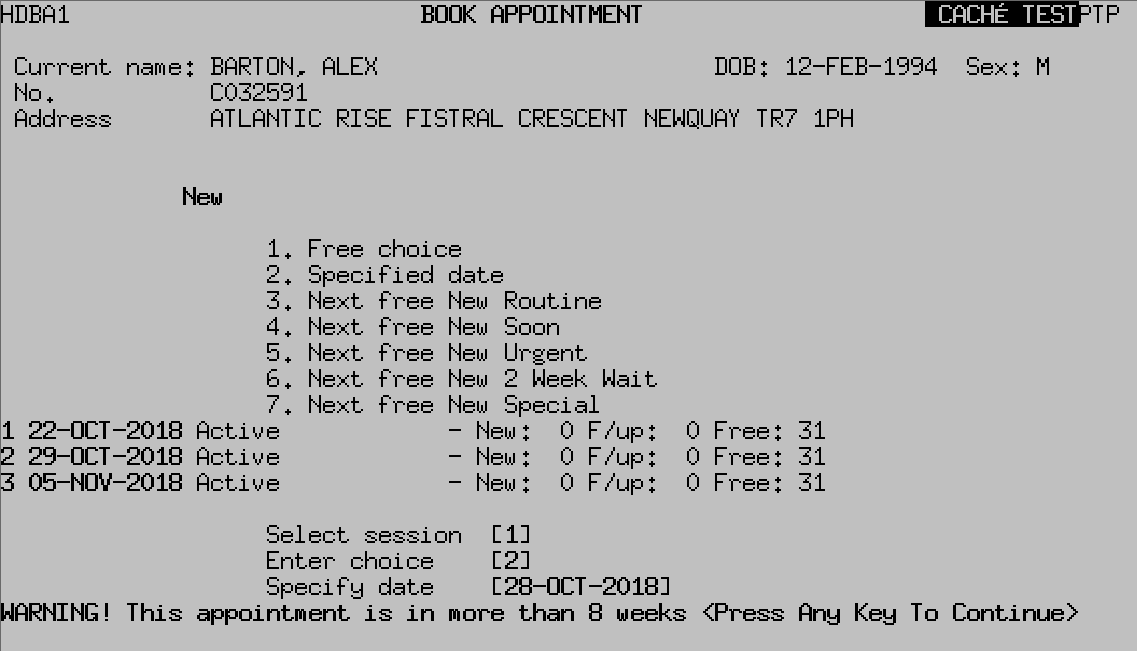
- If Specified date was used select a date from the three displayed then select an appropriate time slot.
- Once a session date has been selected you will see a warning at the bottom of screen indicating the wait time for the new appointment.
Note: Check the weeks against your internal speciality target.
Book Appointment screen, - Select available time slot
Correct?, - The system defaults to Y to confirm you have the correct patient, press the enter or return key to confirm.
Urgency, - Ensure that the correct urgency code is entered, press the F1 key for Help.
Reason for Referral, - Press the return key to return through to default to the Advice & Consultation. Or press the F1 key for Help.
BTyp, - 0, = No Choice. DO NOT USE "No Choice"
- 1 = Partial, - This is used when we offer a date without contacting the patient but given 3 weeks written notice.
- 2 = Full, - Is used when the patient is contacted by telephone and aware of appointment details at time of booking.
Care Stage, - Must be entered, - Press the F1 key for help.
- F (face to face) – to be used for all patients whose intended appointment is due to be undertaken as a face to face appointment
- V (video) – to be used for all patients whose intended appointment is due to be undertaken as a video consultation (can be changed to telephone if patient opts to default to a telephone consultation) – please do not record as a virtual consultation (see below)
- T (telephone) – to be used for all patients whose intended appointment is due to be undertaken as a telephone consultation - please do not record as a virtual consultation (see below)
- A (advice and guidance) – to only be used in conjunction with recording retrospective activity for GP enquiries managed through the Advice & Guidance Service on eReferrals; not to be confused with advice and guidance being provided during a clinic appointment, when the consultation could be F2F, video or telephone
- X (virtual) – to only be used for appointments when patient care is progressed, but the patient is not in attendance (eg MDT) – virtual appointment should not be used for either video or telephone appointments or advice and guidance
- H (home visit) – only to be used when a patient is being seen in their own home
Admin Category, - Type N for NHS and press the return key, or press the F1 key for Help.
Category of Detention, - Press the return key to return through, the field defaults to Not Detained.
Remarks, - Return through or F1 for Help.
Field 11, - Freetext comment field.
Services, - Press the return key to return through this field, or press the F1 key for Help.
Source of Attendance, - Pressing the F1 key will give you a code list. Ensure you select the correct Referring source, PAS Outpatients - Source of Attendance
Type of Referrer, - Pressing the F1 key will give you a code. Ensure you select the correct Referrer code.
Actual Referrer, - Enter the referrer code. If GP is entered in the Source of Attendance the Registered GP details will default in this field. REMEMBER to enter the referring GP if different.
If the referring GP is a Locum, Trainee or Temporary GP you MUST enter the Registered GP name in this field.
Ensure the GP and Practice details are correct, as incorrect data will result in a delay in payment for patient care and correspondence reaching the GP.
Date Request Received, - Enter the date the referral was received (See Note below before pressing enter).
Note: Bottom of screen check the weeks against your internal speciality target. This warning is only displayed for a few seconds.
Two week Rule?, - Type N for No (Y for Yes is only to be used by the 2 week cancer referral office), then press the return key.
Actual Referral Date, - Enter the date the referral was written, then press the return key.
Type Ay and press the return key to Accept any changes. The appointment is now made.
You will be prompted to create or link to a Pathway ID. PAS Outpatients - Starting a Pathway ID for New Appointments, or to link to an RTT Pathway ID, PAS Outpatients - Linking Pathway ID for follow up appointment