PAS Inpatient - Confirm Admission
Estimated Reading Time: 3 MinutesConfirm Admission
This function is used when a patient has been allocated a TCI (to come in) date from the waiting list system (B E A). Many of the admission details will have already been entered e.g. the TCI date, ward etc. - this is known as Pre-documentation. The admitting clerk will confirm the admission on the patient’s arrival.
From the Inpatient Basic menu select Confirm Admission ( H I C A), search for and select the patient. Check that the patient details are correct and amend any details if required. Remember type Ay and press the return key to Accept the details.
Type Ay and press the return key to Accept the details and you will be taken to the Secondary screen. Religion, Ethnic category and Consent to share with chaplaincy service are mandatory fields. Type Ay and press the return key to Accept any changes.
Enter C O for Contacts. If there are details entered check these are still current and amend if required. If no details are entered and you are able to find this information please enter as soon as possible. Type Ay and press the return key to Accept any changes made.
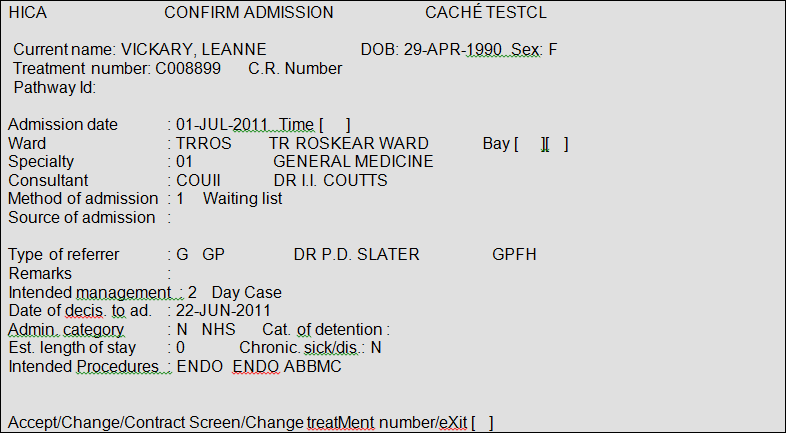
Time, - Enter the time of admission, this must be entered using the 24hr clock. e.g. 10pm would be entered as 2 2 0 0.
Bay, – If known enter the Bay and then the Bed the patient has been allocated. Press the F1 key for Help in both fields. If the Bay and Bed are not know return through these fields, the Bay and Bed can be allocated at a later stage.
Consultant, – Patients MUST NOT be admitted under a generic consultant. i.e under Mr Endoscopy (E N D O) this would be the consultant who performs the procedure
At the point of admission the consultant should only be changed if the pre populated code is a generic consultant code.
Source of admission, – Press the F1 key for help.
Cat of detention, – Press the F1 key for help.
Type Ay and press the return key to Accept the details. The patient has been admitted.
Create tracer?, – Type Y and press the return key for Yes, as you will need to view the location of the notes. If you make up a new set of notes or create a Temporary folder ensure that you tracer these appropriately.
If the episode is not currently linked to a RTT Pathway ID you will be asked to make a link. Type P A L and press the return key to proceed to the Pathway Allocation screen.
If you can clearly identify a start date for the episode you can select Start New Pathway.
However, if the start date of the episode is not identifiable DO NOT start a pathway. Firstly seek guidance from a colleague or line manager and if they are unable to help please contact the Patient Administration Division (P A D) on ext. 2 9 4 1 and ask for the P T L team.
Start New Pathway, – Type S N P and press the return key.
Initiating Provider, – Enter the appropriate provider code. for example R C H T, or press the F1 key for help.
Pathway ID, - To create an ID type the letter Ay and press the return key, the next available number will automatically be assigned for example R E F 0 0 0 7.
Clock start, – To be decided.
Type Ay and press the return key to Accept the details.
Linking a Pathway
When in the Pathway Allocation screen if a pathway has been started for that consultant and it is for the same condition you can link the episode as described below.
From the Pathway Allocation screen type S P W (Select PathWay) and press the return key.
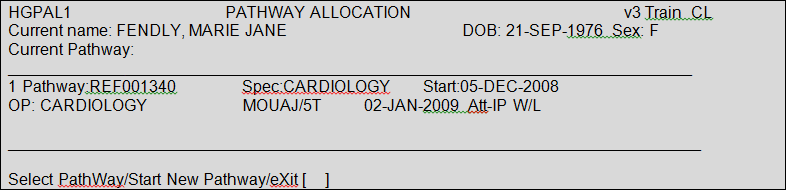
Pathway ID, – Type the number corresponding to the episode you need to link for example 1 and press the return key.