DMWM - Transcriber Guide - Hybrid
Estimated Reading Time: 8 MinutesDragon Medical Workflow Manager
Transcriber Guide - Hybrid.
Log in
Before logging in, ensure your foot pedal and headphones are connected to the PC.
The Home Screen
You will be presented with your home screen. Here you will see a list of the various elements of your workflow or ‘queues’ ![]()
and a series of tabs to help you manage your queues ![]() .
.
See below for details on: 1. Workflow/Queues, and 2. Tabs- Managing your Queues.

WORKFLOW or QUEUES
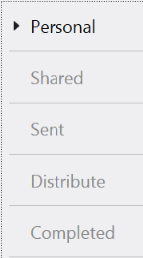
On the left of the screen you will see your ‘queues’ or workflow stages.
As a secretary, you will belong to one or more typing ‘groups’. Group members have access to a pool of documents from all the clinicians in their specialty and can then pick specific documents to work on. The documents for your group can be found in these queues and each queue represents a different stage in the document workflow.
Any documents that an author has marked as urgent will show in red and appear at the top of the relevant queue.
Shared Queue - When a document and voice file is sent by the clinician to be typed or amended, it is automatically sent to the ‘Shared Queue’ of the typing group for the correct department. Everyone in the typing group can see and open these documents. Documents from the Shared Queue need to be moved to your ‘Personal Queue’ so that you can work on them. They are no longer visible to the group once they are in your Personal Queue.
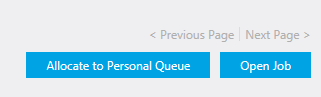
Opening a document from the Shared Queue by double clicking on it automatically moves it to your Personal Queue. If you do not want to open the document, but do want to move one or more documents to your Personal Queue to work on later, highlight the relevant rows, right click and select ‘Allocate to Personal Queue’ from the drop down menu. Alternatively, highlight the relevant rows and click the ‘Allocate to Personal Queue’ button at the bottom of the page.
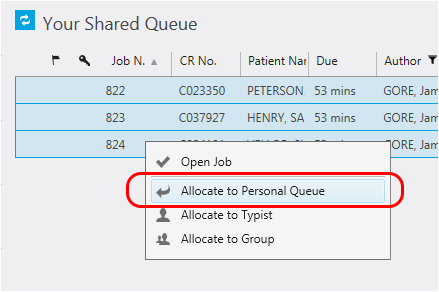
If you work for more than one department, all of the documents from all of your typing groups will appear together in the Shared Queue. Clicking on the column headers will allow you to sort quickly.
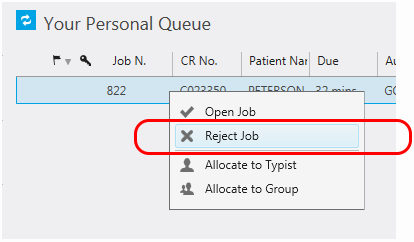
Personal Queue - If you move a document to your Personal Queue by mistake and wish to remove it, right click on the document in the list and click ‘Reject Job’ from the drop down menu. If you work for more than one department, Winscribe will automatically send the document back to the correct group.
Sometimes an author may wish to return a document to you after you’ve sent it to them for signing, if they wish for changes to be made. These documents will appear back in your Personal Queue but will be marked with a green marker in the category column so that you can easily identify and prioritise them. The author will also have been prompted as a reminder to leave a comment to explain the changes that need to be made.

Distribute Queue - These are all of the documents which are ready to be distributed to their recipients. See the section below on distributing documents for details.
Completed Queue - These are the documents which you have distributed. A read-only copy remains accessible from here for your reference.
TABS- MANAGING YOUR QUEUES

These enable you to better manage the work in your queues, especially if you belong to more than one typing group.
Home - This tab will return you to your home screen and your queues list.
Groups & Typists Tabs - these allow you to search for all documents currently allocated to any group you are a member of or any typist in a group you are a member of. This includes documents in all of their queues.
It is not recommended that documents ordinarily be opened from these tabs, as the user they are allocated to may already have them open and be working on them. If this is the case, the document will open as a read-only version. Best practice is to ask your Super-User (CAL or team leader) to specifically re-allocate the documents to your own queue before working on them- they will need to do this for documents to be distributed in any case as these cannot be directly accessed by another user.
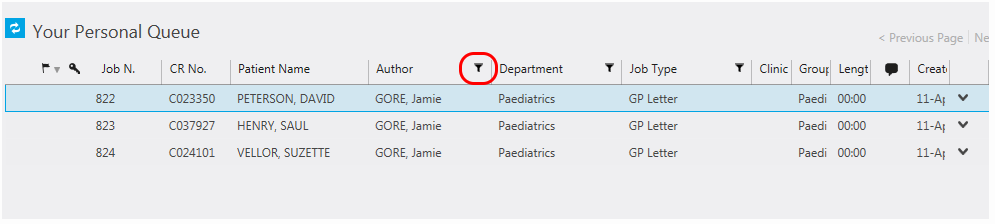
Filters - this allows you to filter the list of documents by department, by job (document) type, or by author, so that you see only those documents. Filters can be created from any queue and can be saved. To use a saved filter in future, you will need to select it from the Filters Tab.
To create a filter, click on the funnel icon next to the criteria to filter by in the column header.
You will then be presented with a dialogue box for you to complete the conditions for your filters.
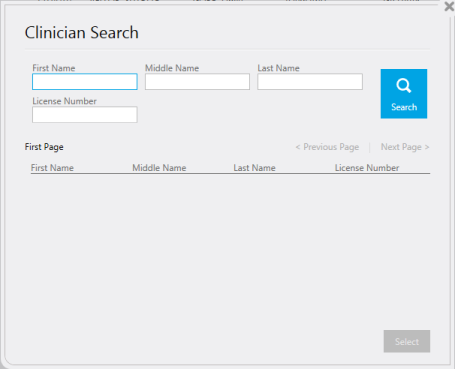
If filtering by author:
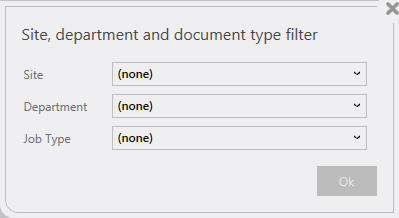
If filtering by department or job (document) type:
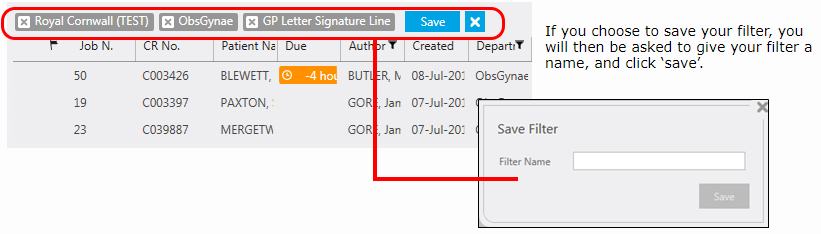
The conditions of your filter will then be displayed above the list of documents and can be saved by clicking the ‘save’ button or removed with the ‘X’ button.
To use a saved filter in future, click the Filters Tab. Saved filters will be listed on the left of the screen.
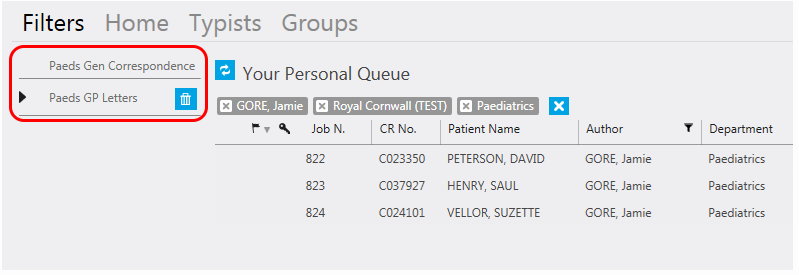
Select your chosen filter from the list and then click the ‘Home’ tab to return to your home screen to view your queues. Your filter will be applied to all of your queues until you remove it by clicking the ‘X’ button. This will remove your filter but it will remain saved for future use.
To delete a saved filter, click the trash can icon next to the filter name under the Filters Tab.
Typing or Amending a Document
To type a document from digital dictation or amend a voice recognised letter, open the job from the Shared or your Personal Queue. You also need to have the system open which you are typing into eg Maxims or Bluespier.
Here you can use your foot pedal or the play bar buttons onscreen to start the playback of the voice file and type directly into Maxims or Bluespier as normal.
You do not need to also type or copy the text into Winscribe as Documents are not reviewed within Winscribe in the Hybrid mode. The voice file will remain with the job for future reference.
Appointment ID
If the author has created the document from outside of the clinic environment, an appointment ID will also be helpful for future reference, though is not critical using the Hybrid workflow. This will depend on whether the document content is related to an existing episode of care.

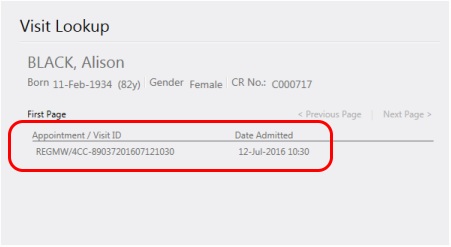
The appointment ID should be added from the patient banner. Click the ‘…’ button within the Appointment ID field to view a list of the patient’s recent appointments in the Visit Lookup dialogue box.
The appointment can be identified by the clinic code (which is followed by the unique appointment ID) and the date and time of the appointment.
Select the relevant appointment and double click to insert.
If the document content is not related to any specific episode of care, this field can be left blank.
Comments
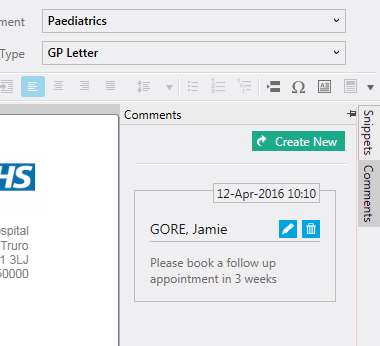
Authors are able to pass on comments or instructions to the typist, which may be to include a pre-saved paragraph or to perform a particular task.
This is done with Comments. These can be found on the right of the job screen in a pop-out menu.
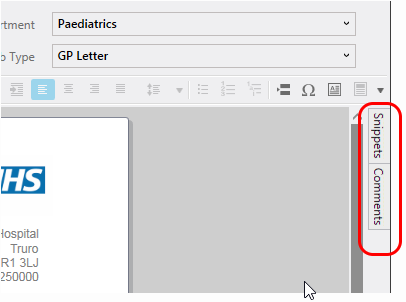
Snippets function is not relevant for the current Hybrid Workflow
Comments enable communication between the author and typist without including these as part of the voice file or document text. You will need to acknowledge comments before you are able to send a document.
Finishing a Job
If you have started work on a Job and need to save your changes to return to later, clicking ‘Save’ will return the job in its current state to your Personal Queue.
You can also direct the job to the Personal Queue of another typist to complete, if you know you will not be able to return to finish it. Click the ‘Send to Typist’ button and enter the name of the secretary when prompted. The document will now appear in her Personal Queue.

When you are happy that you have completed the job, that the entire voice file has been transcribed accurately, the job can be marked as ‘Done’. Any document review will be carried out in Maxims or Bluespier using current workflows.
Distributing a Document
The distribution of Dragon Medical Workflow Manager is not available in the current Hybrid Mode of Dragon. Therefore all distribution is to be carried out within the system the document is created eg Maxims of Bluespier.
Document Import to the Electronic Patient Record
There is currently no automated integration of documents to any other Trust system.