BNA - The Guide
Estimated Reading Time: 7 MinutesBirth Notification Application (BNA) - Guides
Introduction
The NHS Numbers for Babies or Central Issuing Service (N N 4 B or C I S ) system and the Interim NHS Numbering System (I N N S ) are both going to be discontinued from 1st January 2015. It is expected that the majority of sites will migrate to a Personal Demographics Service (P D S ) Compliant Maternity or Child Health system that will integrate the local system with the P D S .
There will be a number of sites that, for what ever reason, will not be migrated onto a P D S Compliant Maternity or Child Health system by this time. These sites will need a mechanism to allow users to register a birth and obtain an NHS Number for the baby. The mechanism to do this is called the Birth Notification Application (B N Ay ).
The BNA contains all of the functionality currently in the C I S or I N N S , along with some additional features. The B N Ay will allow users to:
- Trace for a mother’s P D S record;
- For the baby, enter details for the Birth Notification and create a new record on the P D S including Allocating an NHS Number;
- Print Birth Notifications, Blood Spot Labels and Identity Wristbands; and
- View stored Birth Notifications.
For maternity sites that do not have a P D S Compliant Maternity system, users will need to enter the details of the birth into both the local maternity or PAS system and the B N A . This dual keying is necessary because there is no link from the local maternity system or Patient Administration System (PAS) to the P D S .
What does this mean for us?
The new process will be:
- Register birth on Stork
- Do not try to allocate a new NHS number for baby
- New Encore report will need to be run, this will show all births on Stork which do not have an NHS number
- NHS numbers for these babies will need to obtained from BNA
- NHS number for baby will need to entered into PAS
NB. Do not request a new NHS Number in Stork.
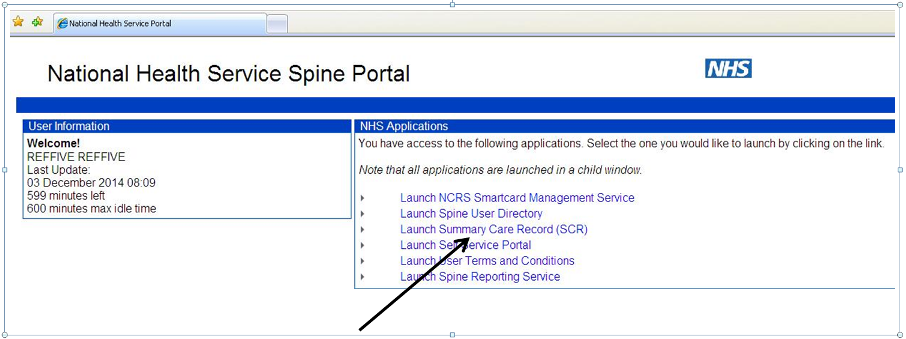
Login to B N Ay using Smartcard
Insert your card into the card reader and then enter your Passcode.
Click Yes I accept and wish to proceed for the purpose of Patient Care.
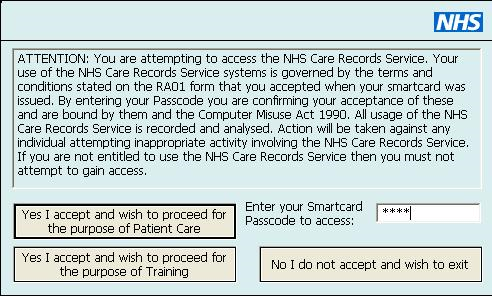
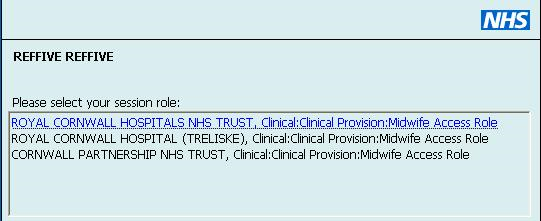
If you have more than one role you will need to make a selection.
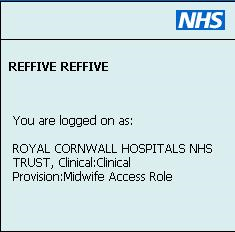
You should then see this message if your login is successful.
Double-click the C S Ay icon on your desktop.

The following screen will automatically open and load.
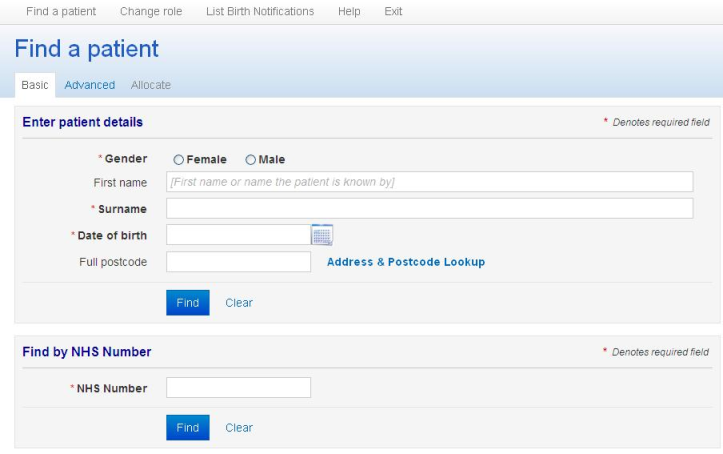
Patient Search for Mother
Search for the Mothers record using either NHS number or Gender, Surname and Date of Birth.
The preferred method is to use NHS number.
Unable to locate Mothers record
If you have attempted all possible searches for the mother’s record, but no matching record has been found then you will need to register the Baby only in order to get the NHS number.
Click Birth Notification at the top of your patient search list. Continue to enter birth details as shown below.
DO NOT try to register the Mother yourself.
You will then need to email rcht.dataquality@nhs.net so that that this can be investigated.

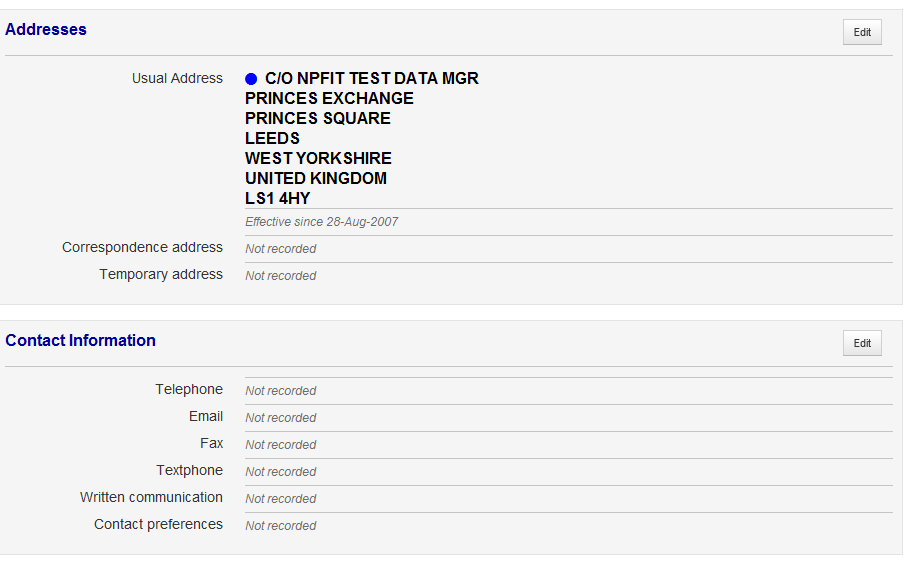
Updating Mother's Details
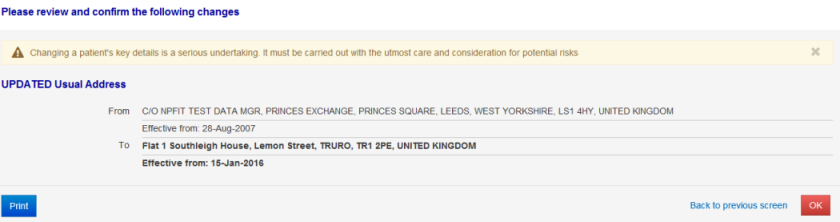
When you locate the Mother’s record, check that all the details are correct. If there are errors (for example a different address from PAS) and you have confirmed that this is the correct record please update the address.
To update the address you need to click on edit that is on the top right of the address box.
Click on edit.
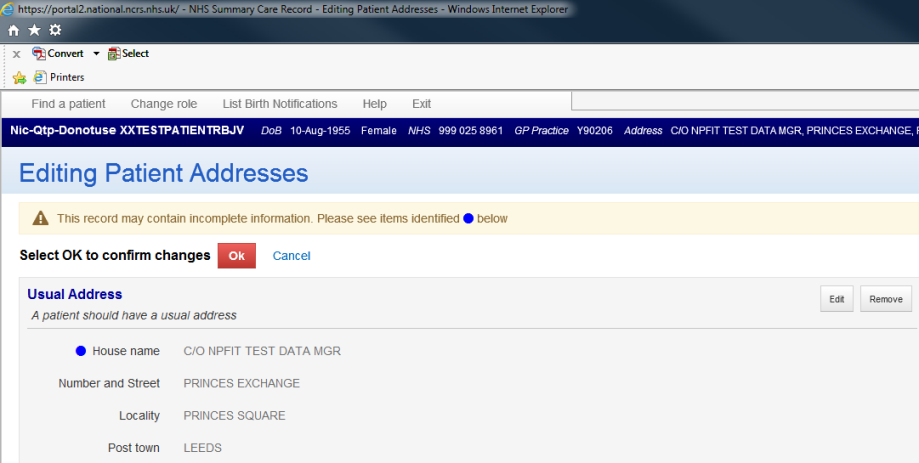
Click on clear.
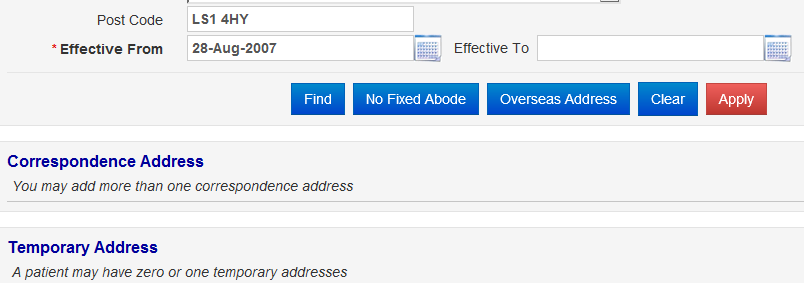
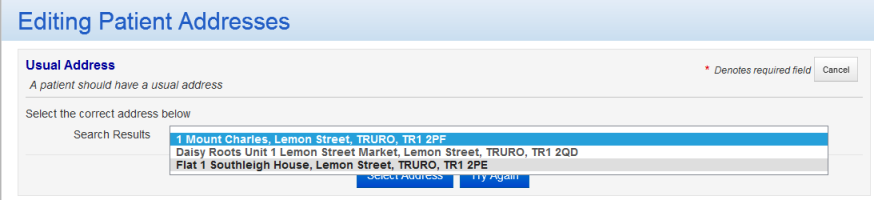
Select the correct address using the dropdown from the search results.
Click on Select Address.

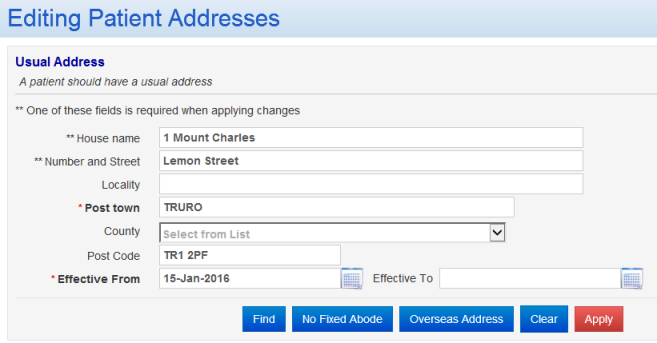
Click apply.
Select OK to confirm changes, – please make sure you use the OK at the top of the page.
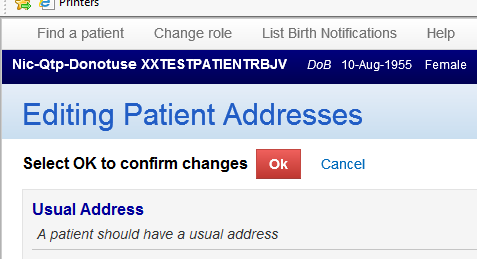
Please ensure this is the correct address before clicking OK.
Click the Birth Notification Tab.
Enter Birth Details
Note: Mothers Details remain at the top of the screen.
Start entering Delivery details.
** at least one of these fields must be entered.
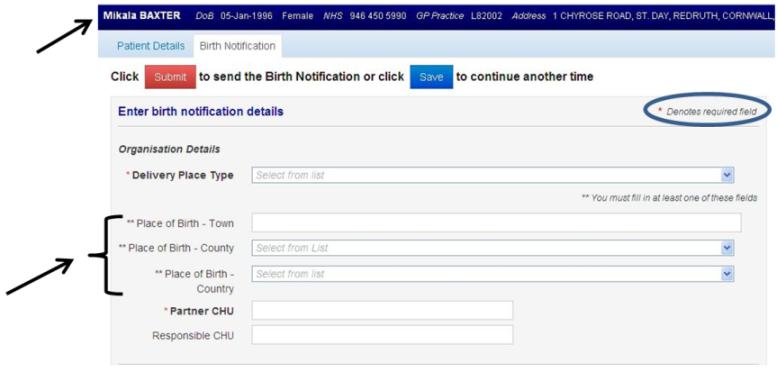
After selecting a Delivery Place type you may be asked for a Delivery Place Code, these are as follows:
- REF12 - Treliske
- REF89 - St Mary's
- REF86 - Helston
- REF81 - Penrice
Partner C H U , – enter DF913 which will show as Truro South West CHIS Office.
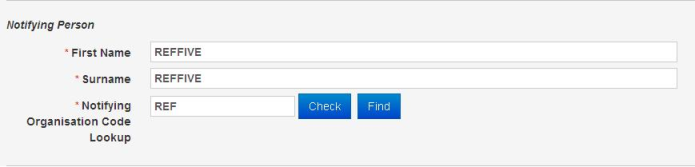
Your details should pre-fill in this section.
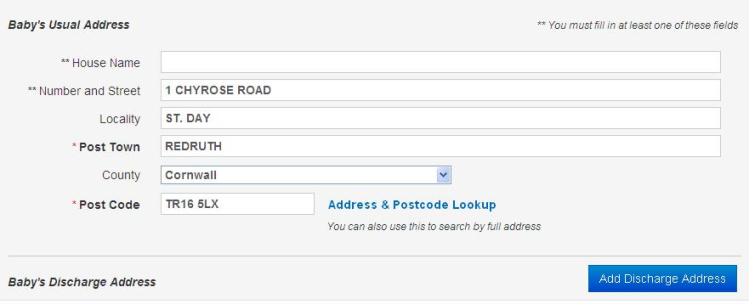
Enter Baby Details.
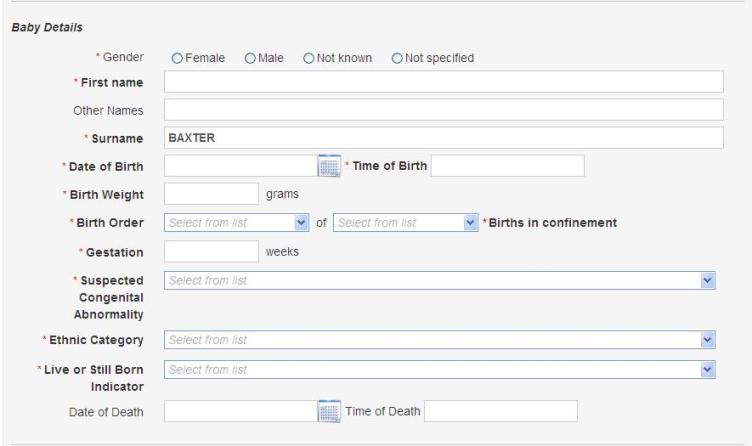
Baby’s usual address will auto-fill with the Mother’s address.
If appropriate add the discharge address by clicking the button.
After checking that all required fields are completed, click Submit.

Duplicate Checking
After submitting a Birth Notification the entered details are validated. Any errors or omissions will be highlighted. If there are no errors then a Birth Notification will be submitted to the PDS where a number of checks are performed to ensure that the Birth Notification is not a duplicate, for example that the Birth Notification has not already been entered.
If the submitted details are similar to Birth Notifications that have been submitted then this is classified as a ‘potential duplicate’. A list of these potential matches are displayed to the user. The user should look though the list of potential matches and confirm that the details they have submitted are unique. If this is the case then the Birth Notification should be re-submitted. This will then send the Birth Notification to the PDS without further duplicate checks.
If the submitted details are an exact duplicate to a Birth Notification that has already been submitted, then an error message is displayed. It is not possible to re-submit an exact match.
Response from B N Submission
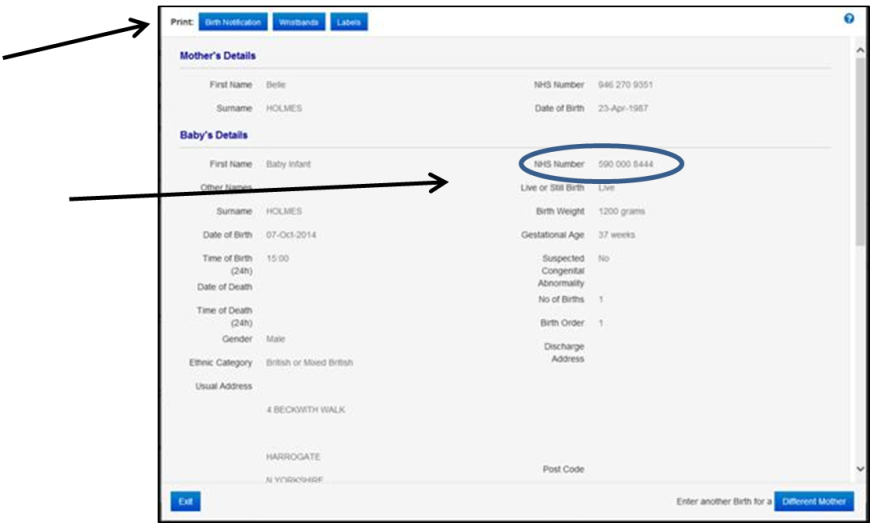
After submitting a Birth Notification a Response screen will be displayed that shows all of the information included in the Birth Notification and the outcome of the submission.
Please print this response.
Failed Submission
After submitting a Birth Notification, if an error occurs then an error banner will be displayed across the top of the screen indicating why the submission has failed.
The Birth Notification will be saved to allow the user to meet any local business procedures that need to be carried out following a Birth Notification failure. The failed submission can be managed in the list birth notifications screen. Successful Submission.
After successfully allocating an NHS Number for the Birth Notification, a response screen is displayed. This displays the baby’s NHS Number and all of the details that have been entered.
A number of options are available following a successful Birth Notification. These options are:
Printing the Birth Notification, – this is advisable
This option allows the user to print the Birth Notification as part of a discharge notice, or as a means to pass information to Child Health Units in the event of an error or a failure in obtaining an NHS Number for the Baby.
These Birth Notifications can also be used as part of the local process for dual-keying if they are required.
Printing the Blood Spot Labels, – do not use
Print from usual source
Printing Identity Wristbands, – do not use
Print from usual source.
Entering Another Birth Notification
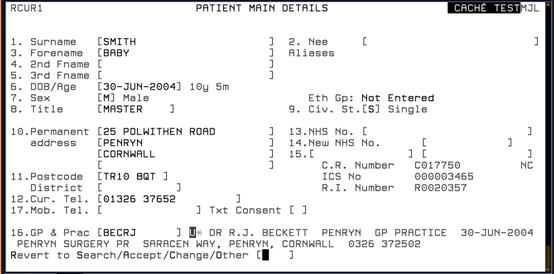
Log into PAS as normal and search for the Baby’s record on the RI as you would when updating the baby’s forename and open the record.
To enter the B N Ay allocated NHS number for the baby, type C14 to move the cursor to the New NHS No. field and then type in the NHS number from the successful birth notification you printed out.
Press Enter to return to the bottom of the screen and type Ay to Accept and press the return key.